Mittens à la Dux
—Novice Knitter Mitten Pattern
This pattern is written for beginners who may not be accustomed to reading knitting patterns. These instructions are written for a mitten loom set that has an 18-peg hand loom and a 12-peg thumb loom (similar to the In-the-Attic adult sized mitten loom set). This is a row-counting pattern that is based on specified weights/types of yarns. You need to know how to e-wrap, how to knit one strand over two (one-over-two), how to knit a flat piece (back-and-forth instead of around-and-around), and you need to know how to take a project off a loom by using a strand of yarn to gather and tie off your last loops.
Your result may be different if you use different yarns, or if you wrap quite a bit more loosely or more tightly than I do, or if you use a different style of wrap. But that doesn’t matter—your mittens will probably still be warm, beautiful and original!
Before You Start
• We each have our own comfort direction, and it does not matter in which direction you wrap your loom. Just remember that the first two pegs you wrap on each round are pegs one and two.
• You are making two small "hats," and the bigger one has a hole in it.
• To make these mittens thick and snug, I used a total of two strands of yarn in each wrap, and did a one-over-two knit off for each stitch.
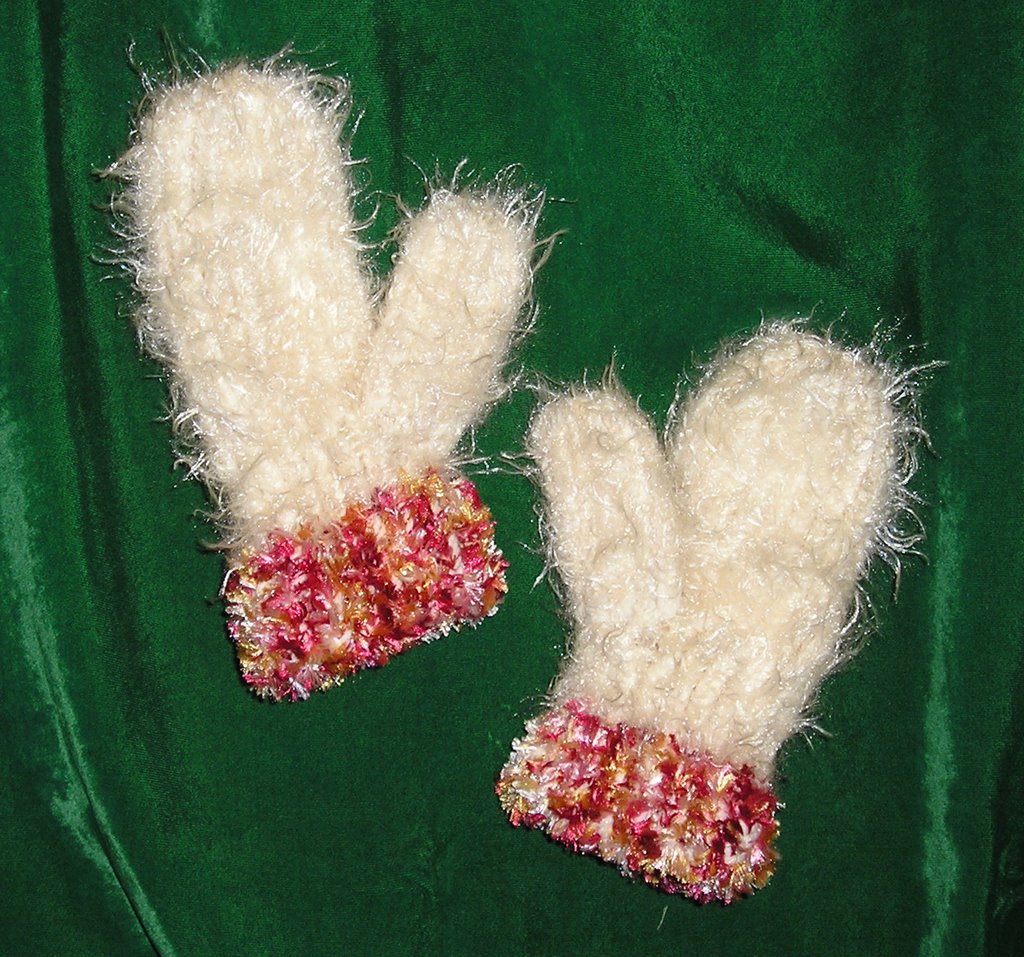
• To make these mittens warm and soft, I used one strand of Lion Brand WoolEase worsted weight (WW) 4-ply lambs wool/acrylic blend, and one strand of a thin but very soft fun fur (FF) in a matching color. I used less than one skein of each for both mittens.
• I also chose a highlight color of eyelash/boa (E/B) for the cuff. I used less than one half of a skein of the boa.
The Pattern—Row Counts
My hands are large for a woman, and medium for a man. These mittens end up roomy for me, yet they fit my 10-year-old daughter's hands as well. By shortening the hand and thumb length and changing the cuff stitch, this same pattern made mittens for my 6-year-old daughter.
Inside Cuff. E-wrap THREE ROWS with a DOUBLE STRAND of worsted weight. Knit off ONE wrap over TWO. [HINT: I pulled strands from both the inside and the outside of the same skein to get two strands.]
E-wrap and knit off FOUR MORE ROWS with that double strand. Total: FIVE rows. [HINT: This gives a plain inside edge of easy-to-spot loops so that you can identify the right one to lift over the pegs for the cuff.]
Outside Cuff. Next start a strand of the E/B and drop one strand of WW. You still have a total of TWO working yarns. E-wrap and knit off FIFTEEN more times, for a total of 20 cuff rows.
Anchor the Cuff. Reach inside the mitten, bring up a loop (remember, a loop is two strands of yarn), put it over the peg it matches, repeat until all the loops are placed. Knit off a row just like you would with any other cuff.
Cuff to Thumb. Cut the E/B off (leaving a 4" tail), and replace it with a strand of fun fur. You are still using TWO working yarns. E-wrap and knit off TEN more times, which takes you to the base of the thumb. DON'T start a new row of wrapping yet. You'll have two loops on each peg.
Thumb Hole. Now it's time to wrap a few flat rows. Mark the peg that your working yarn is wrapped around. This will be your STARTING peg for your flat work. Now mark the peg next to it (the one that you would wrap next) — this will be your ENDING peg for your flat work. You will now start a flat section by knitting back-and-forth (the long way around, not the short!) between these two pegs. Wrap and knit off eight to ten rows on this flat section (you be the judge — better too many than too few, your thumb has to fit and you can always sew up the extra space). Notice that a slit is forming? That's your thumb hole. Remember, you are still doing a one-over-two with two strands — that hasn't changed.
Back to Round-and-Round. Once you have finished your eight to ten rows of flat work, go back to wrapping all of the pegs all the way around. You are now ready to start the top of the mitten.
Mitten Body. Just like before, KO the bottom loop over the two above it for 35 more wraps and rows. This will take you to the top of an average sized mitten. Go ahead and stick your hand in it along the way to judge whether this is the right length for you, and adjust the length as needed.
8) Finish the body. When you have done 35 ± rows, stop wrapping. You'll have two loops on each peg. Lift the bottom over the top, and you'll have one loop on each peg. Wrap once more all the way around the loom, then knit off that last one-over-one. Cut your working yarn off, leaving about 4" strands. Now cut about an 18" piece of yarn, and thread it on a yarn needle. Sew that yarn up through the loop on each peg all the way around. When you have them all on your tie-off yarn, lift those loops off the loom. Hold both ends tight as you turn the mitten inside out—this will make sure your knot is on the inside. Tie it off with a square knot, trim the yarn ends, and turn your mitten right side out.
The Thumb. Make a thumb the same way you made the mitten. E-wrap three rows of two strands, knit off one-over-two, then e-wrap and knit a total of 20 rows. Knit off the double loops down to a single loop, e-wrap one more row, knit that off, then gather and tie off as before. You'll have one open end and one closed end.
Attaching the Pieces. Find a film canister, a medicine bottle, or some other small cylindrical plastic item that fits inside the thumb. Slide the film canister into the thumb opening (it should hang out a little). Turn the hand part of the mitten inside out, and push the open end of the thumb (which has the film canister inside it) through the hole. The right sides of both pieces are now together. Work the edges of the two pieces (mitten hole and thumb) until they line up and you can see them both, then whip stitch them together (you're using the film canister as support while you do this).
The Finish. When you are finished stitching the thumb piece on, pull the film canister out and turn the mitten right side out. You’ll have a nearly invisible seam between the two, no gaps or holes or ragged edges. Weave the ends of your loose yarn pieces in or trim them off and you are done.
For Children’s Mittens
Change the cuff pattern to alternating pegs of knit stitch (e-wrap) and flat stitch. This produces a cuff that is shorter, tighter and less bulky.
For the mitten body, knit a total of 25 rows instead of 35. For the mitten thumb, knit 15 rows instead of 20. This reduces the length of the body and thumb enough to fit a smaller child’s hand.
Special Note On Cuffs
You do not have to make a cuff! Cuffs are thick, warm, sleeve filling, and can be fun, but if you want a longer, slimmer mitten, then don’t bother. Just knit between 10 rows (short cuff) and 20 rows (long cuff) before you start the pre-thumb rows. You can still use a fun yarn in the mix, it just won’t be doubled up. If you want it snugger, add a few rounds of elastic thread in your knitting along the way, or for snuggly ribbed cuffs, alternate purl stitch with e-wrap on your pegs.
posted by Duxall Inarow at 8/29/2006 03:32:00 PM
![]()
![]()

0 Comments:
Post a Comment
<< Home